Robot Death Star Lamp
Written on June 16th, 2023 by Michael SuguitanThe infamous IKEA PS2014 “Death Star” lamp is practically begging to be robotized, so I did. Many others have had the same idea. My implementation is not particularly novel apart from the use of a Dynamixel XL330 smart motor that simplified the electronics and installation. The modification is a 3D-printed screw-drive actuation mechanism and is non-invasive for reversibility.
Implementation
I provide implementation details for others to hack their own lamps.
Hardware
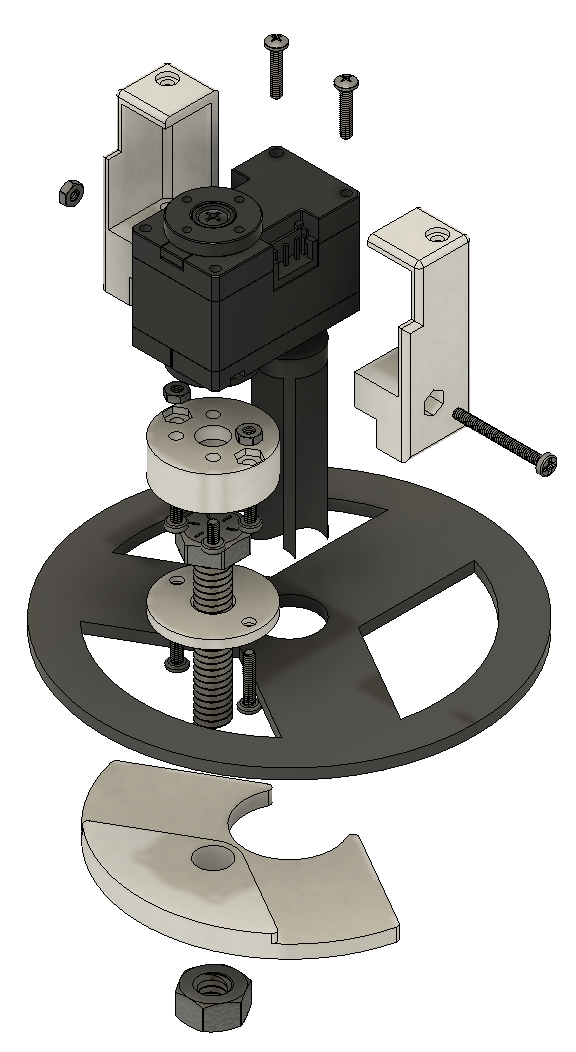 Exploded view of the modification. I affixed the motor to the main ‘spine’ of the lamp body with a 3D-printed motor-body mount (top center). The screw-drive actuator is a 1/4” 6” bolt mounted to the motor horn with a 3D-printed bolt-motor mount (left). The actuator raises the actuating ‘scaffold’ with another 3D-printed component (bottom).
The lamp’s mechanism is really neat: linear actuation of the ‘spine’ swings the panels open. The mechanism reminds me of the wing-opening mechanism from the Master Grade Wing Gundam Zero — a robot of unparalleled nostalgia for anyone who watched Toonami circa 2000. I initially tried a winch mechanism to ‘reel’ up the moving component — I dubbed it the ‘scaffold’ — but it proved too heavy for the Dynamixel XL330 motor I constrained myself to using. I pivoted to a screw-drive mechanism to orient the load of the scaffold parallel to the motor’s axis, thus relieving the motor from the torque caused by the scaffold’s weight. I specifically used coarse-thread hardware to gain linear velocity, as the screw-drive’s linear travel is proportional to the steepness of the thread angle.
Although the XL330 proved slower than motors used in other modifications, it provides a great simplification of the electronics. Other implementations required limit switches to sense the endpoints of the scaffold’s actuation to prevent damage to the lamp body. The XL330 features an extended position control mode for ±256 revolutions with position sensing, which enabled me to define the endpoints in software instead of requiring hardware sensors. Another plus for the XL330 is that it operates at 5V; while this means it has a lower top speed than higher-voltage motors, it can be powered from a simple 5V supply like a USB port on a computer or wall charger.
This list covers the items I used:
- Motor and controller: Dynamixel XL330 (the M288 or M077 are identical externally, though the M077 has a faster gearbox), Dynamixel U2D2 communication board, power connection (e.g. a USB breakout board). A guide for wiring this motor interface which I use for other projects is available here.
- Hardware: 1/4” 6” coarse-thread bolt and nut, M2 bolts and nuts (for the motor mount: 20mm x1, 10mm x2, nut x1; for the 1/4” screw mount: 4mm x2, 8mm x2, nut x2)
- Printed components: Motor-body mount, bolt-motor mount, scaffold actuator mount. The design files are downloadable here.
Software
If you run into any issues, please submit an issue to the repository.
I used my r0b0 library for this ‘rig,’ designated ps2014 after the official name of the lamp.
Beyond controlling the lamp from the command line, I created a simple browser page to enable remote open-close control, even from non-local networks.
First, clone the r0b0 repository and follow the installation instructions:
git clone https://github.com/msgtn/r0b0
Once the repository is installed, we need to set the motor to its extended position control mode and calibrate the endpoints.
Start the ps2014 configuration for the lamp, which contains both the DynamixelGadget controller for the lamp and a minimal web interface through a Page (information on the r0b0 architecture can be found on the repo’s README, and I have to acknowledge rdiverdi’s Dynamixel wrapper library for simplifying the motor control):
python3 start.py ps2014
The script will breakpoint() so we can use the command line interface to get motor information.
The start script will assign ps2014 to the DynamixelGadget object from which we can get the motor object, affectionately denoted 'spine', then turn off the motor’s torque to make it compliant:
spine = ps2014.dxl_dict['spine']
spine.set_torque_enable(False)
Then, we can set the operating mode to ‘extended position’ to enable multi-turn position control. This enables position control through ±256 revolutions with a resolution of ±1,048,575.
spine.set_operating_mode(4)
Then, manually spin the motor until the lamp is fully open / ‘exploded’ with the scaffold at its bottommost point.
Record the present_position value; mine was 180,000:
spine.get_present_position()
Spin the motor in the opposite direction to close the lamp and bring the scaffold to its topmost point, then repeat the position measurement; mine was 450,000. We can also turn torque control back on.
spine.get_present_position()
spine.set_torque_enable(True)
Update the interface’s back-end script r0b0/rigs/static/ps2014.js with these values:
...
    closeButton.onclick = function() {
    console.log('closeButton');
    socket.emit('button',
        {
            event:'button',
            value:450000,		# update this value
            id:socket.id
        });
}

openButton.onclick = function() {
    console.log('openButton');
    socket.emit('button',
        {
            event:'button',
            value:180000,		# and this one
            id:socket.id,
        });
}
...
Note that these values may change whenever you unplug the motor.
Minimal interface
In a browser, navigate to http://localhost:8080.
The buttons on this page will emit the button events from r0b0/rigs/static/ps2014.js to the DynamixelGadget representing the motor.
For remote control from another device outside network, you could set up an ngrok tunnel and have your friend control your lamp from afar using their phone.
This telepresence setup reminds me of Gaver’s ‘Feather, Scent, and Shaker’ artifacts and Goldberg’s robot in the garden: remote communication through physicality and motion.
Conclusion
This was a fun hackathon-esque weekend project that covered basics of mechatronic design, software control, and user interfacing. Future work involves how to persist the functionality either as a standalone device (e.g. with a Raspberry Pi) or connected to a local server. I imagine this being part of a larger network of locally connected robotic appliances, like the animated furniture in Beauty and the Beast.